Build a Power BI Report on Parquet files with the Serverless SQL Pool

Last week, 3th of December, Azure Synapse Analytics was announced to be General Available. Another reason to have some fun with a few of the new features in the Azure Synapse Workspace. Like building a Power BI report with T-SQL without provisioning a ‘traditional’ SQL Server instance and building a data pipeline.
In this blog, we will be using the Serverless SQL Pool included in the workspace, to create just that. Some of the benefits of the Serverless SQL Pool:
- Exploratory Data Analysis with T-SQL on your storage account
- Connectivity with tools like SSMS and ADS
- You are only charged for the data processed
To know more about the Serverless SQL Pool, be sure to check the official documentation. A link is in the references at the end of this blog.
In the end, I will also provide an example of the ‘create external table as select’ statement. This is extremely useful if you need to reuse the results of your data analysis. It allows you to export the data to your storage account in the desired format.
Overview of actions
So how did I do this? What steps are needed to build the report:
- Provision a Synapse workspace
- Have data in a storage account
- Create views in the database
- Import the views in Power BI desktop
Maybe this is a little blunt, but I promise it won’t be difficult. We will go through the steps to take!
Provision a Synapse workspace
In this case, I used the Azure portal to create a new workspace and used all of the standard settings for creation.
- Navigate to the Azure Portal
- Click ‘Create a resource’
- Type ‘Azure Synapse Analytics’
- Fill in the ‘Basics’ tab and click ‘Review and Create’

Have data in a storage account
This is could be the hardest part. In the examples, I use an export of the AdventureWorksLT sample database in Parquet format. If you do not have parquet files, CSV will do the job as well.
You could place your files in the storage account that is created with the Synapse workspace. However, if you would like to use an existing storage account from the same tenant, that is also possible. Just make sure you assign the right roles to the storage account:
Connect your Storage Account to the Synapse Workspace
In case you are not using the created ADLS Account to read data from, a ‘Linked Service’ needs to be configured to the Storage Account. One way to do this is by navigating to the ‘Manage’ tab on the left side. Choose ‘Linked Services’ and click ‘New’. Choose the appropriate storage type and fill out the details.

Authentication via Managed Identity is recommended.
- Assign the Synapse Workspace (system assigned) Managed Identity at least the ‘Storage Blob Data Reader’ role on the storage account via the ‘Access control (IAM)’ tab
- Assign your own Azure Active Directory user at least the ‘Storage Blob Data Reader’ role.
Being ‘Owner’ or ‘Contributor’ on the storage account is not sufficient. Not having this specific ‘Storage Blob Data’ role will result in permission errors when trying to query the files.

Create views in the database
Before we can create views we need a database to create the views on. To do this, open the Synapse Studio via the Azure Portal
Navigate to the ‘Data’ tab. Click ‘Add new resource’ and choose ‘SQL Database’. In the options pick ‘Serverless’ for pool type and fill out a fitting name for your database.

Now we are ready to create a view in the database. In the example below I wrote a join between ‘SalesOrderHeader’ and ‘SalesOrderDetail’.
Navigate to the ‘Develop’ tab. Click ‘Add new resource’ and choose ‘SQL Script’. Add and execute your script. To verify if the view works navigate to the ‘Data’ tab, select your create database, views and under ‘Actions’ choose for ‘Select Top 100 rows’.

Import the views in Power BI desktop
Almost there! Open Power BI Desktop and choose ‘SQL Server’ as your data source. The server name can be found in the Azure Portal. It will likely be
<synapse-workspace-name>-ondemand.sql.azuresynapse.net
Choose your created view and load the data!

Big Datasets
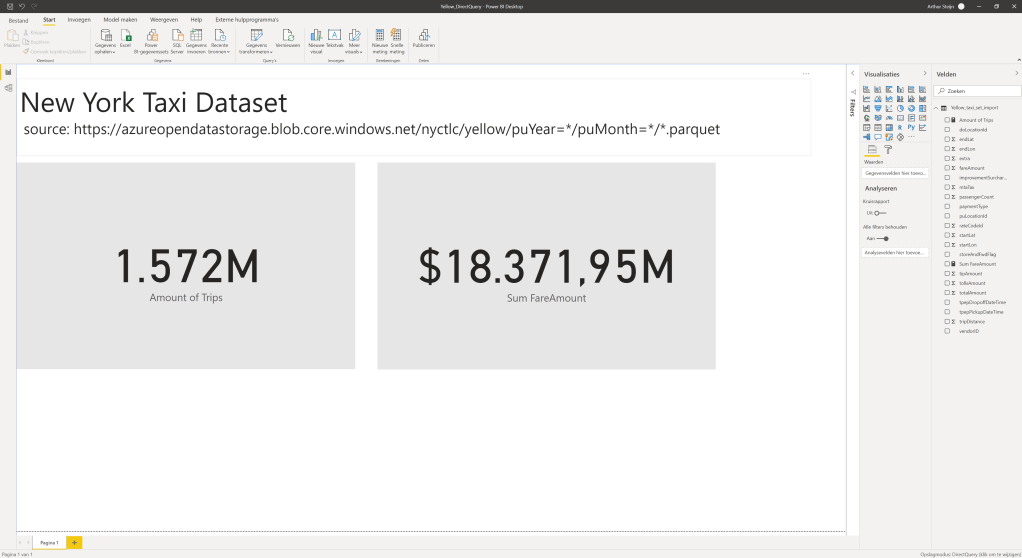
Be aware of the limitations of Import and Direct Query mode. In another example, I made a view of the NYC Taxi Open dataset. And loaded it to Power Bi with the Direct Query mode to prevent the .pbix file from blowing up with the 1.572.000.000 rows.
Create External Table As
Another great feature of the Serverless SQL Pool is the use of the ‘Create External Table As Select’ statement. Basically, it does two things:
- It exports the results to Hadoop or Azure Blob Storage
- And in parallel, it creates an External Table in your database
To be able to use this statement you need to have a few things in place:
- A database master key for encryption
- A database scoped credential for authentication
- An external data source to store and read the data
- An external file format to determine how to store the file
Wrap Up
So my goal was to show you that it is fairly easy to set up an Azure Synapse Workspace and use the Serverless SQL Pool to explore data in the data lake. The advantages are many, among them:
- The ability the use T-SQL
- Connectivity from familiar tools as SSMS and ADS
- Very cost-efficient as you pay per TB of processed data
References:
Microsoft documentation:
Serverless SQL pool – Azure Synapse Analytics | Microsoft Docs
Set or Change the Column Collation – SQL Server | Microsoft Docs
CREATE EXTERNAL TABLE AS SELECT (Transact-SQL) – SQL Server | Microsoft Docs
Learning links:
Realize Integrated Analytical Solutions with Azure Synapse Analytics – Learn | Microsoft Docs
